
Learn how to start a blog by following the steps discussed in this article.
Have you ever wondered how you can start a blog and make money from it?
You can start a blog today. Lots of people have already set up blogs, and they’ve made enough money that enabled them to quit their jobs.
We started this blog right from the same stage that you are right now.
We made lots of mistakes, tried lots of ideas, and here we are today.
In this article, I will show you the steps that you need to take to set up a blog that will make you money. These steps will keep you from making the mistakes that lots of newbies make when they are learning how to start a blog.
Let’s get started.
1. Pick A Niche For Your Blog
The first step that you need to take when you want to start a blog is to decide the niche that you will be blogging about.
You must choose a niche that you are interested in; one that you are passionate about.
You should also ensure that the niche you choose has enough people that are interested in. in other words, there should be lots of topics that people are searching for in that niche.
After selecting a niche, you need to validate the niche through a 3-step validation formula highlighted below:
- Confirm the size of the niche
- Explore the competitors, and
- Analyze the potential of making money in the niche
When you adhere to the steps listed above, you will have a clear idea of how large the size is, the competition, as well as the monetization potential of the niche. If you want to know how to do these, keep reading this article.
2. Choose A Blogging Platform
When you want to choose a platform for your blog, you need to check the available platforms and determine the blog management software that you intend to use for your blog.
It is advisable to build your blog on WordPress.
Let’s take a look at the two blogging platforms that you can use for your blog.
Self-Hosted Blogging Platform
An example of a self-hosted blogging platform is WordPress.org. You have few options when you’re selecting self-hosted blogging systems for your blog (also referred to as Content Management System; CMS). WordPress.org is the most popular, free, and open-source self-hosted blogging platform.
WordPress.org, and other self-hosted platforms, allow you to create your blog and operate it on your domain and website hosting platform. This gives you total control over your blog and the contents in it. Hosting your website on self-hosted platforms costs just a few dollars monthly, while the domain costs around $10 per annum.
If you plan to run ads on your blog, or if you want to sell products and services through your blog, having a self-hosted blogging platform is the right way to go.
Hosted Blog Solutions
As a beginner, you may be tempted to start your blog on free hosted platforms like Tumblr.com or Blogger.com.
Although these platforms are free, you need to understand that they have limitations.
For instance, your blog name will appear like a subdomain. Examples include yourblogname.tumblr.com or yourblogname.blogspot.com.
Another limitation emanates from the need to follow the rules and restrictions of the platforms.
Free hosted blog solutions are only ideal for testing a blogging platform. However, if you want to take your blogging career seriously, you need to pay for full services as well as a custom domain name.
3. Choose A Domain Name
Your domain name is the name by which your blog will be recognized online. Irrespective of the niche that you choose, your domain name will be your blog’s unique address on the internet.
For instance, this blog’s domain name is blogamigo.com. This name will be ours as long as we continue paying the yearly fee for a .com domain name.
People that know your blog’s domain name can just type it into the address bar of their browsers. This will give them access to view your blog. Other users can also discover your blog by making use of search engines like Bing and Google. It is, therefore, important to choose a unique name for your blog.
Your domain name may be a ‘dot com’ domain name. It may also be specific to your country or niche. The best approach is to get a ‘dot com’ domain name, however, you can think of using other extensions (such as ‘dot blog’ or ‘dot net’).
If you cannot find the domain name that you like, the company that you bought your domain from may give you the option of choosing one later (Bluehost gives this option). This will give you time to think of a name that you want before you launch your blog.
4. Get A Hosting Account
For you to understand what a hosting account is, I’ll use the analogy of a building and land.
If a building is a blog, then the land on which the building is located is the hosting account.
In other words, your hosting account helps your website to found on the internet.
Choosing a reliable hosting service is an important decision that you need to make.
A wrong web hosting platform can create serious problems for your blog. It is like choosing a telecommunication company with poor or no reception. Your web hosting platform plays a crucial role in the success of your blog. You need to choose a provider that is reliable if you want to start a well-functioning blog.
After studying different information online, most especially information on the official website of WordPress, I found Bluehost to be a reliable and widely used hosting platform.
So, I’ll shed more light on how to use it as we proceed in this article.
5. Install WordPress
Once you have chosen the hosting service provider that you want to use for your blog, the next step is to install the WordPress software. You need to sign up for your website hosting account to do this.
As stated earlier, I will show you how you can create a blog with Bluehost. I will support my explanations with screenshots of those pages that you need to go through when creating your blog.
So, without further ado, here are the steps that you need to follow if you want to sign up for your web hosting account and install WordPress.
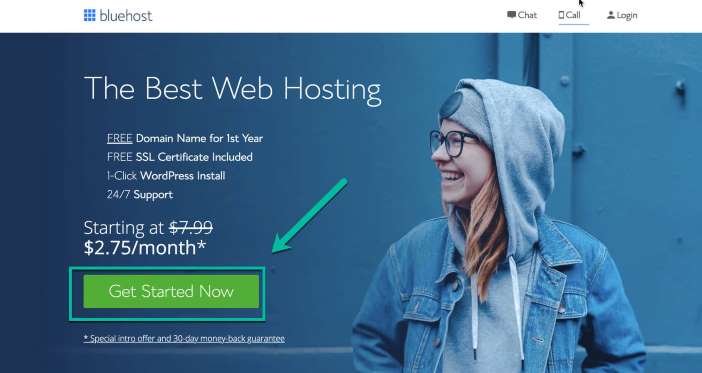
Go to the Bluehost homepage
Go to Bluehost.com in your browser to visit the Bluehost website. Once it loads, click the green ‘Get Started Now’ button shown in the screenshot below.
Select the hosting plan that you want
As stated earlier, your blog address is your domain name. Therefore, take your time to choose a unique name (and one that your audience can easily remember). To do this, type in the name you desire in the new domain’ box, and Bluehost will inform you if it is available or taken.
If the name has been taken, Bluehost will show you a list of other related names that you can choose from.
If you can’t find the name of your choice at the moment, don’t be discouraged. You can skip this step and pick a name when you start your blog.
Choose a Bluehost domain name
If you have bought your domain name from another platform, you can use that domain name. All you need to do is to type it into the ‘Use domain you own’ box.
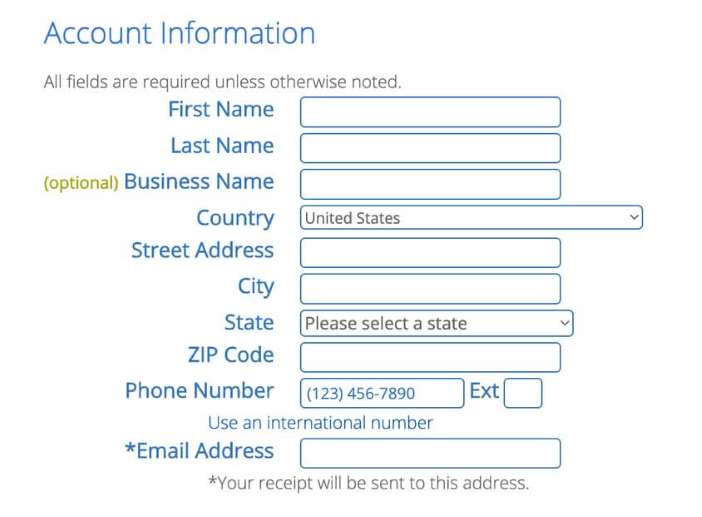
After you have chosen your domain name, Bluehost will direct you to the registration page where you can put in your information manually. If you want to make this process easier, sign in with your Google account.
You can start adding your account information by filling in your personal information.
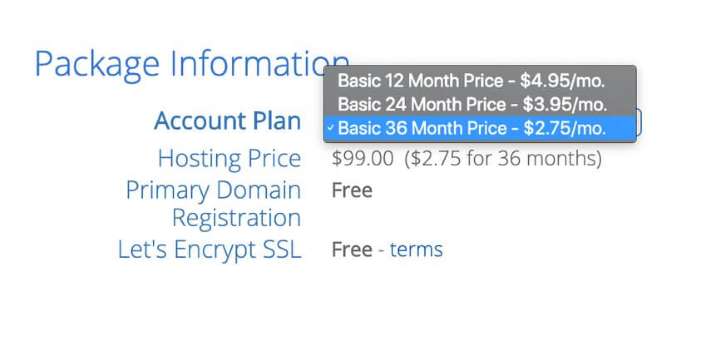
Then, you need to select a hosting package from the options available on the website. Bluehost has 12, 24, and 36-month web hosting packages.
A 12-month hosting package enables you to pay a lower amount while the other two packages offer you better deals if you want to get involved in a longer-term commitment. Your specific needs will determine what you choose.
There are package extras that you can choose from. You need to review these packages very well. All the extras are not important. So, uncheck the boxes of extras that you don’t need. This will reduce the total amount that you will pay.
You can add extras later if the need arises. I, however, suggest that you check the Domain Privacy Protection box. This will hide your personal contact information from the public.
The next stage is to enter your payment information. Check the box in the image to show that you have read and agreed to the terms of service, then click the ‘Submit’ button.
After submitting, Bluehost will send you a confirmation email. Bluehost will also ask you to activate your domain name.
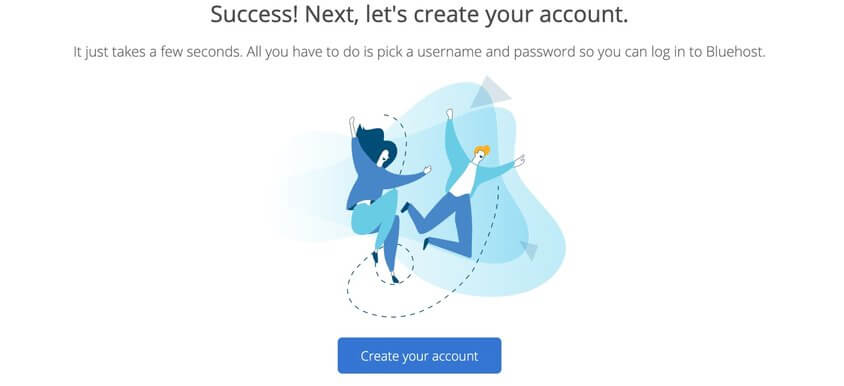
Once you’ve done this, you will be able to set up your Bluehost account. This takes you a step closer to launching your blog.
The steps listed below are actions that you need to take to create your Bluehost account:
- Click the ‘Create your account’ button.
- Type in your password and set up your account.
- Once you do this, your account is ready. Login by clicking the ‘Go to login’ button.
- Finally, type in your email or domain name and password.
That’s all. You can now start creating your blog.
6. Create Your WordPress Blog
After logging in to your account, Bluehost will provide a 4-step process that will guide you to start your blog. Follow this procedure if you’re starting a blog for the first time.
You may also skip this step and work on creating your blog from scratch inside your Bluehost hosting account.
7. Launch Your Blog
You can customize your WordPress blog from inside your Bluehost account. Once you’re through, click the ‘Launch My Site’ button and your blog will be live.
If you type your domain name in a browser, don’t be discouraged if it doesn’t look right. This is the first draft. You need to apply some changes and add content from inside your WordPress account dashboard. These will make your blog look nice and complete.
You can go to your WordPress blog dashboard by clicking on the ‘WordPress’ button located at the top right corner of your computer or smartphone screen.
8. Write and Publish Your Blog Content
We have gone over how you can choose a domain name and blog hosting platform. We’ve also looked at how you can set up your blog. The next step is to write and publish content on your blog.
This is the area that will determine whether people will keep coming back to your blog or not. Your contents need to be engaging and persuasive if you want your audience to perceive you as an expert in your niche.
9. Optimize Your Blog Content For SEO
SEO (Search Engine Optimization) helps you to get more traffic to your web pages from Google and other search engines.
Recent studies showed that about 5% of all website traffic comes from organic search. This study shows how crucial it is for you to optimize your blog content for search engines.
There are many techniques and tactics in SEO. You need to know these tactics and understand them. I won’t be dwelling on these tactics in this article. However, ensure you do the following for every content you publish on your blog:
- Carry out keyword optimization, and
- Add SEO meta tags on your blog pages.
10. Monetize Your Blog
You can make money from your blog through information products, online courses, e-books, webinars, etc.
You can also promote other people’s products and services and get paid commissions for doing so.
Lastly, you can monetize your blog through freelancing and consulting; use your blog as an avenue for finding clients for your services.
Conclusion
It is easy to start a blog.
You only need to invest some hard work and grit when you want to make money from your blog.
Creating blogs is more affordable now than ever before.
Although you will encounter obstacles that may want to discourage you. However, keep pursuing your passion and share it with the world through your blog.
Get started right now by getting a domain name and hosting from Bluehost.
An alternative to Bluehost is Web Host Bros.
Then keep churning out unique and high-quality content. As you do this consistently, you will build a loyal audience that will trust you and buy from you when you monetize your blog.
What’s holding you back from starting your blog?